Support for Section Volunteers and Trustee Board members in using the Microsoft 365 portal.
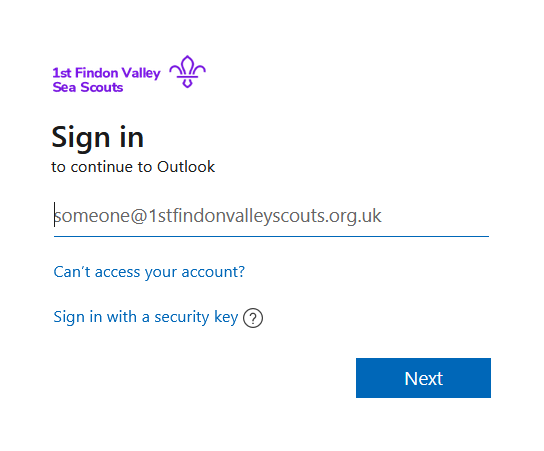
Login
Login to Mircosoft 365
You can log in to the Mircosoft 365 portal and access all of the products by using this link: https://1stfindonvalleyscouts.org.uk/portal
You can also go directly to Outlook on the Microsoft 365 portal by using this link: https://1stfindonvalleyscouts.org.uk/outlook
Step 1
Enter your full email address, then tap Continue. This will be: first.last@1stfindonvalleyscouts.org.uk.
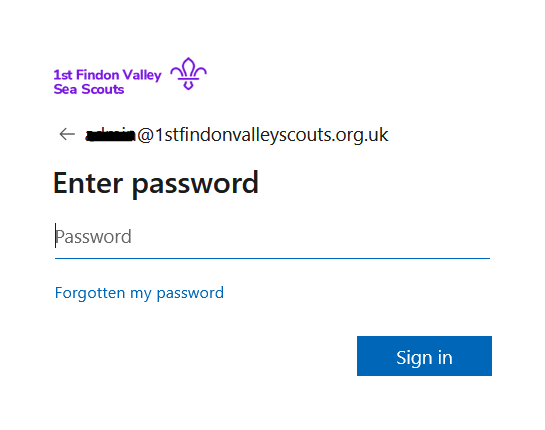
Step 2
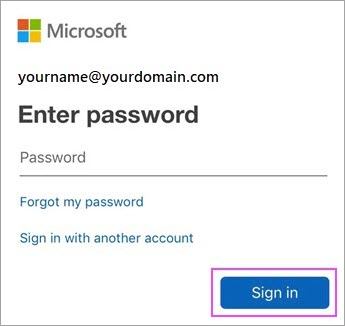
Enter your email account password and tap Sign In or Next.
Success
You have logged into the Microsoft 365 portal. You can now select which product you would like to use.
Forgotten my password
If you have forgotten your password, please contact Steven so that it can be reset. Once reset you will then need to update this password on any devices that your emails are synced to, for example, your phone.
Most devices will prompt you to update your password however some may require you to go into the account settings.
Emails Login & Setup
Access emails using Outlook in a web browser
You can go directly to Outlook on the Microsoft 365 portal by using this link: https://1stfindonvalleyscouts.org.uk/outlook
You can also access Outlook from the Microsoft 365 portal homepage.
Step 1
Enter your full email address, then tap Continue. This will be: first.last@1stfindonvalleyscouts.org.uk.
Step 2
Enter your email account password and tap Sign In or Next.
Success
You have logged into Outlook on the Microsoft 365 portal.
Set up email in the “Outlook for Android” app
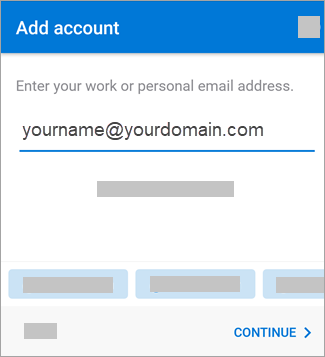
Step 1
If you do not have the app already:
Install the Outlook for Android app from the Google Play Store and then open it.
Tap Get Started if this is your first time.
If you already have the app:
To add another email account, open the Menu > Settings > Add Account > Add Email Account. Then skip to step 4 under Set up another email account below.
Step 2
Enter your full email address, then tap Continue. This will be: first.last@1stfindonvalleyscouts.org.uk
Note: The sign in screen should show the 1st Findon Valley Scouts logo.
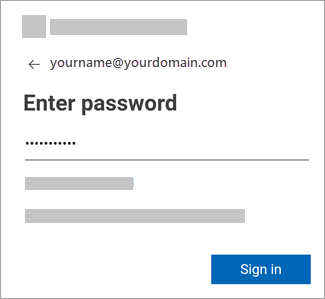
Step 3
Enter your email account password and tap Sign In or Next.
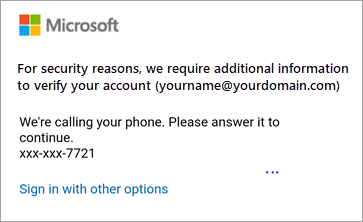
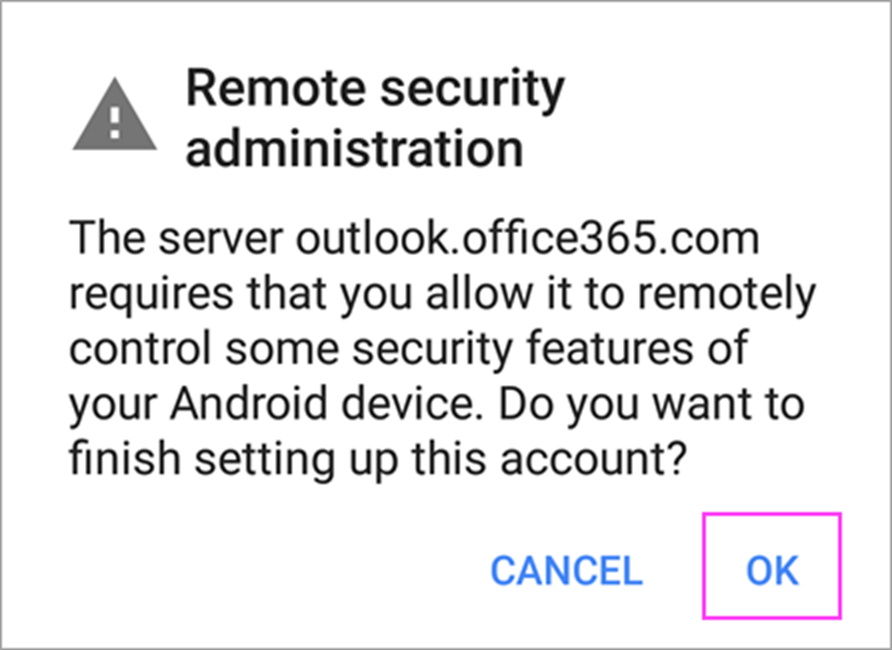
Step 4
If multi-factor authentication is enabled, verify your identity. For more information, see Security info overview.
Account Set up complete
Your email account set up is complete.
Set up email in the “Gmail” app
Before you begin, update the Gmail app to the latest version:
- Open the Google Play Store app on your phone or tablet.
- Type “Gmail” into the search bar and then select Update.
Note: If the update option is not available, you’re already on the latest version.
Step 1
Open the Gmail app.
Tap the menu icon in the upper left corner > Settings > Add account > Exchange and Microsoft 365.
Important: Do NOT choose “Outlook, Hotmail, and Live”.

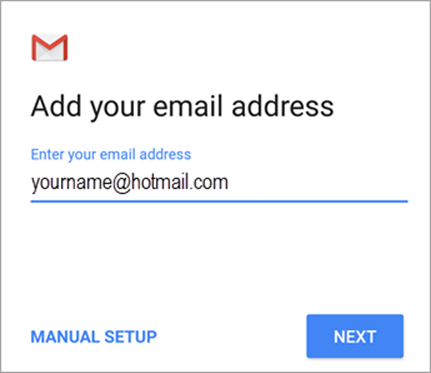
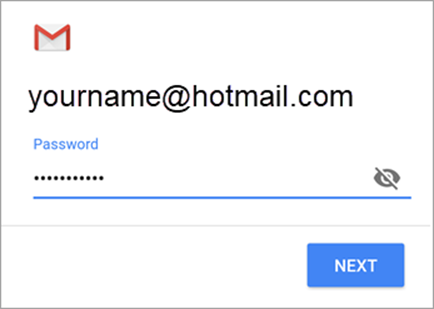
Step 2
Enter your full email address and tap Next. This will be first.last@1stfindonvalleyscouts.org.uk
Enter your password and tap Next.
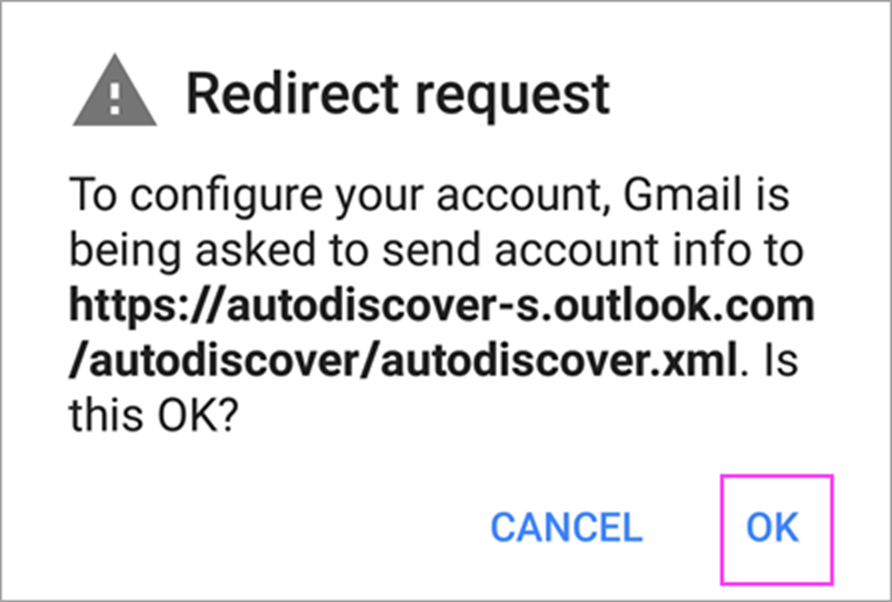
Step 3
You may see a redirect request screen. Tap OK.
On the Incoming server settings screen, change your server to outlook.office365.com.
Step 4
Follow any prompts you may get for security or device permissions, sync settings, and more.
Step 5
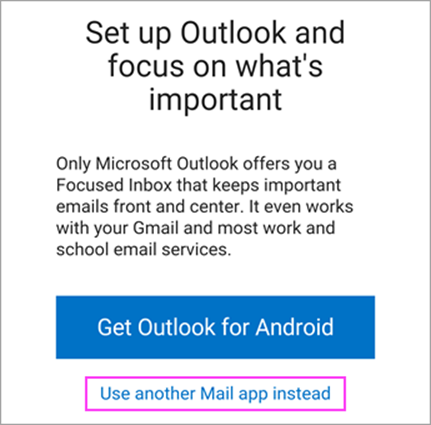
Go to the inbox you just set up. If you see an email that says “Action Required to Sync Email,” open it and tap Use another Mail app instead. If you don’t see this message and emails are syncing, skip this step.
Step 6
Pull down the Android notification bar by swiping down from the top of your screen.
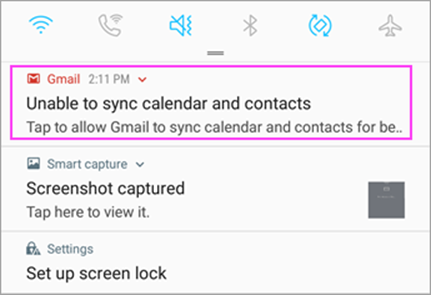
If you see a notification that reads “Unable to sync calendar and contacts,” tap it. Then tap Allow to give access and you’re done! Note: If you don’t see a sync error, verify your calendar and contacts are syncing, skip this step.
Success
Your email account set up is complete.
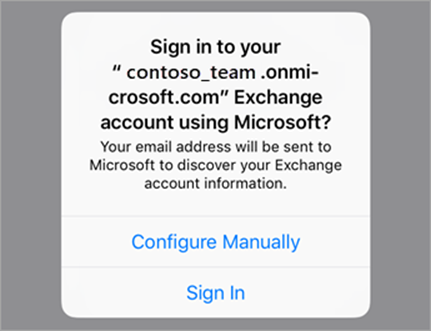
Set up email in “Outlook for iOS mobile” app
Step 1
Download Outlook for iOS from the iOS App Store and then open it.
Note: See system requirements for your iOS devices here.
Step 2
If it’s your first time using Outlook for iOS, enter your full email address, then tap Add Account.
If not, open the Menu > tap Settings > Add Account > Add Email Account.
This will be first.last@1stfindonvalleyscouts.org.uk
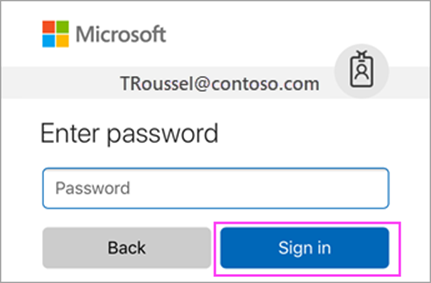
Step 3
Enter your email account password and tap Sign In.
Step 4
If multi-factor authentication is enabled, verify your identity. For more information, see Security info overview.
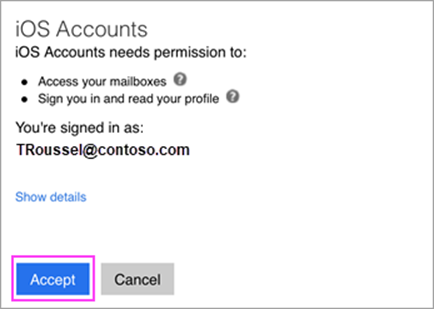
Step 5
Accept any prompts for permission you may receive.
Success
Your email account set up is complete.
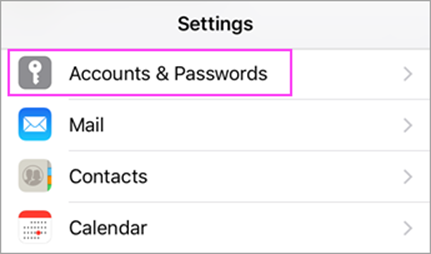
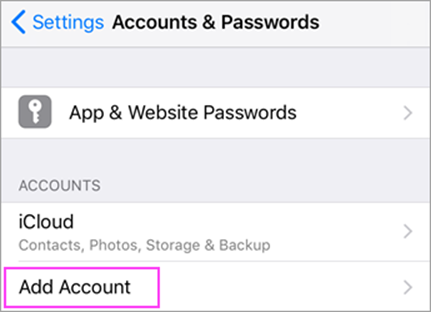
Set up email in the iPhone/iPad “iOS Mail” app
Step 1
Go to your iPhone or iPad’s Settings > scroll down and tap Accounts & Passwords > Add Account.
Note: If you’re on iOS 10, go to Mail > Accounts >Add Account.
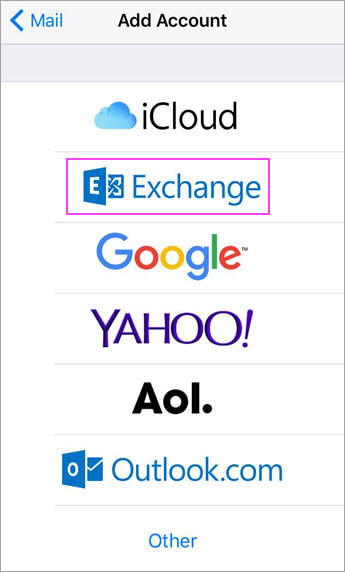
Step 2
Select Exchange.
Step 3
Enter your email address and a description of your account. Tap Next. This will be first.last@1stfindonvalleyscouts.org.uk . Description can be 1st Findon Valley.
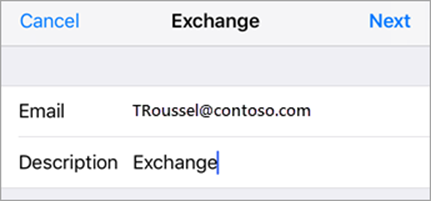
Tap Sign In.
Step 4
Enter the password associated with your email account. Tap Sign in or Next.
Step 5
The Mail app may request certain permissions. Tap Accept.
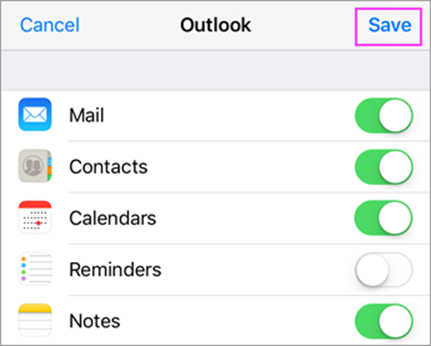
Step 6
Choose the services you want to sync with your iOS device and tap Save. Mail is essential, others are optional.
Success
Your email account set up is complete.
Set up email in Windows “Outlook”
-
Open Outlook.
- Type in your email address, this will be first.last@1stfindonvalleyscouts.org.uk
- Then select Connect.
- Type in your password and select OK.
If you want to add an additional account, select File > Add Account and repeat the steps.
Success
Your email account set up is complete.
Set up email in “Mac OS X Mail”
If you’re running Mac OS X version 10.10 or later, follow these steps to set up your email account:
- Open Mail, and then do one of the following:
- If you’ve never used Mail to set up an email account, the Welcome to Mail page opens. Go to step 2.
- If you’ve used Mail to create email accounts, select Mail > Add Account.
- Select Exchange > Continue.
- Enter the name, email address and password for your Exchange account > Sign In.
- Choose the Mac apps you want to use with this account. Mail is essential, others are optional.
- Click Done.
If the Mail program isn’t able to set up your account automatically, wait a few minutes or a few hours, and then repeat these steps. If after repeating the steps Mail still isn’t able to set up your account automatically, see below.
What else do I need to know?
- Some issues are resolved just by updating to the latest available released version of Mac OS X. See the Apple website for update instructions.
- Connecting to your email account through Mail for Mac may fail if you haven’t registered your account. Login using a web browser to the Microsoft 365 portal to ensure your account is set up and ready to go.
Outlook
Turn off Conversation View
Conversation view is a setting, turned on by default, that groups emails with the same subject together. It shows you how the conversation evolved, and you do not have to open several emails to follow the conversation. To turn off, follow these steps:
- Using a web browser, log in to the Microsoft 365 portal and open Outlook.
- In the top left, select the settings cog.
- Scroll down to Conversation View and change to Off.
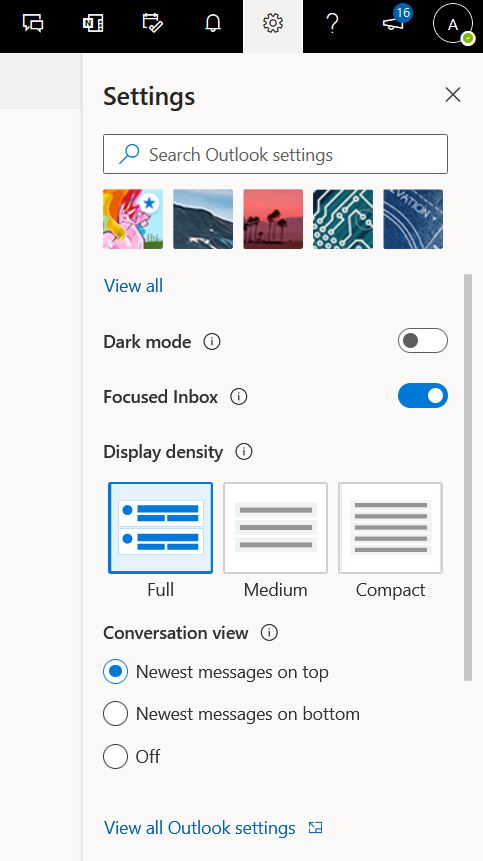
Turn off Focused Inbox
Focused Inbox separates your inbox into two tabs, Focused and Other. Your most important email messages are on the Focused tab while the rest remain easily accessible, but out of the way, on the Other tab. To turn this feature off, follow these steps:
- Using a web browser, log in to the Microsoft 365 portal and open Outlook.
- In the top left, select the settings cog.
- Scroll down to Focused Inbox and toggle to Off.
Add a signature
You can add a signature to emails sent using Outlook on the Microsoft 365 portal. To add a signature, follow these steps:
1 – Using a web browser, log in to the Microsoft 365 portal and open Outlook.
2 – In the top left, select the settings cog. Then at the bottom, select View all Outlook Settings.
3 – On the left select, Compose and reply.
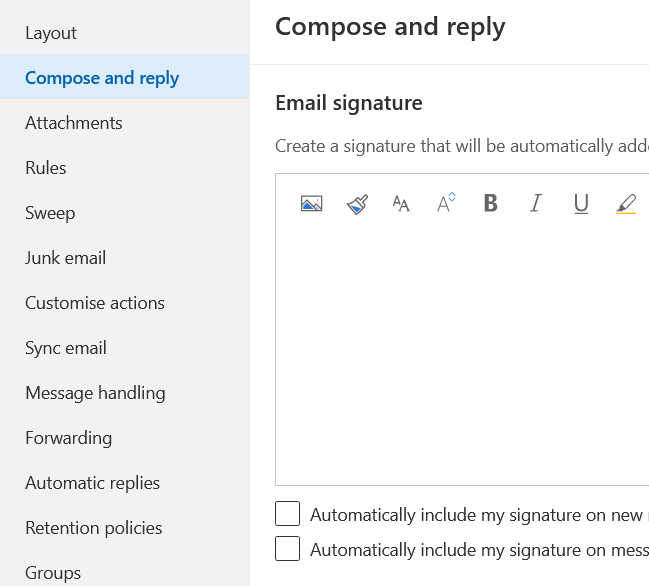
4 – Add the text to your signature.
5 – You can choose if your signature is added automatically on all new emails and emails you reply and forward.
6 – Click Save.
Here is the template email signature from the brand centre:
Send file from OneDrive or SharePoint as an attachment
Login to Outlook through the Microsoft 365 portal.
1 – Select New Message.
2 – At the top, select Attach, then select Cloud Locations
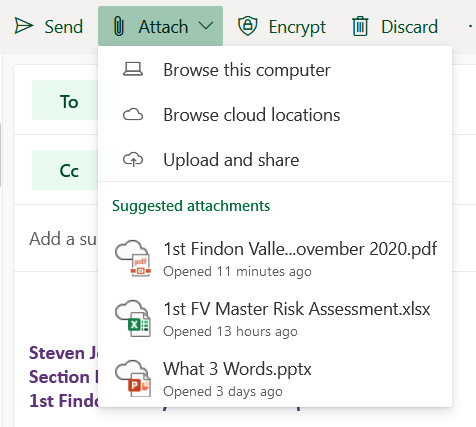
3 – A window will appear, on the left select either OneDrive or Groups to access a SharePoint site.

4 – Select the group where the document is saved (skip this step if the document is saved in OneDrive).
5 – Find and select your document to attach to the email.
This adds the attachment to your email without downloading it. All users with access to the file on M365 will be able to access the attachment.
SharePoint
Access SharePoint
Step 1
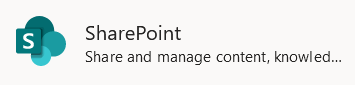
Login to the Mircosoft 365 portal (more detailed instructions can be found on this support page) and select SharePoint from the list of apps on the left. The logo looks like this:
Step 2
SharePoint will open and you will see any group that you are members of. Select the group that you want to access.
Success
You can now access any of the documents and information stored in that SharePoint group.
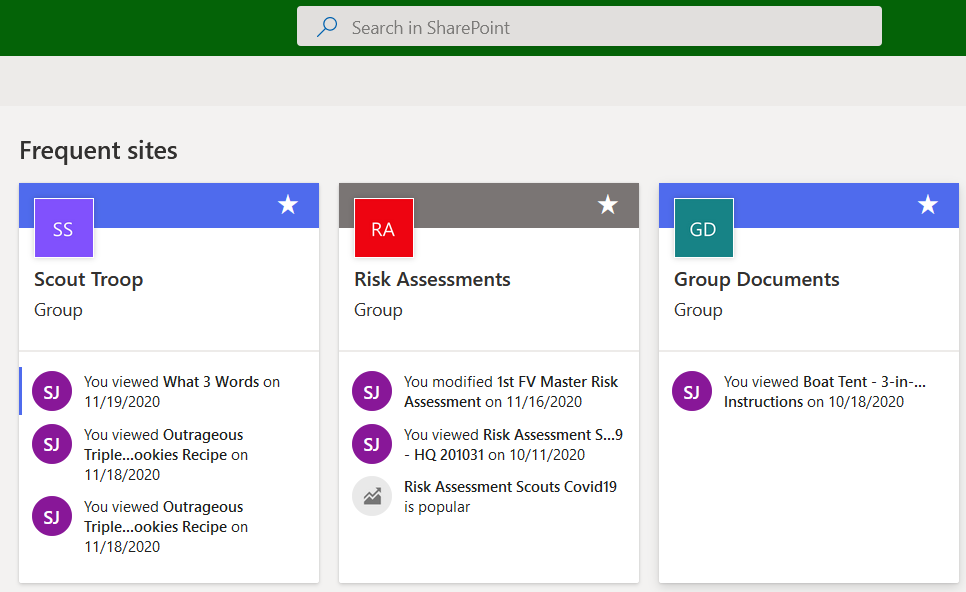
SharePoint sites that I can access
In SharePoint, you can search for the following groups, they will only appear if you have access to them:
Sync SharePoint files and folders to your computer
Sync the files in your SharePoint site libraries so they’re always available on your computer, even when you’re offline.
Turn on Files On-Demand in OneDrive
- Select the white or blue OneDrive cloud icon in the Windows notification area.
![]()
Note: If you’re on Windows 10, your computer already has the OneDrive desktop app on it, but you’ll need to turn on Files On-Demand in OneDrive settings.
- Select Settings.
- Select Settings > Save space and download files as you use them.
Set-up sync
- On the SharePoint site that you want to sync files from, select Sync.
Note: If your browser asks for permission to use OneDrive, confirm that it’s OK.
- Sign in to OneDrive to start syncing your files and finish OneDrive setup.
Work with your files in your file system
- Once synced, your SharePoint files appear in File Explorer under the name of your organization, or in Mac Finder if you’re using a Mac.
- Each location will appear in a separate subfolder.
- Copy or move files from your computer to SharePoint right from your file system.
- To check the status of your files, add an account, or manage other sync settings, select the blue OneDrive cloud icon in the Windows notification area.
Work with files in Files On-Demand
When Files On-Demand is on, you’ll see new status icons next to each of your SharePoint files. You can now copy or move files from your computer to SharePoint right from your file system.
Save space on your device by making files online-only.
These files are only available when you’re connected to the Internet, but don’t take up space on your computer.

When you open an online-only file, it downloads to your device and becomes locally available.
You can open a locally available file at anytime even without Internet access.
To make a file always available, even when you’re offline:
- Right-click it and select Always keep on this device.
To change a file back to an online-only file:
- Right-click it and select Free up space.
Scouts RAM – Risk Assessments
How to access Scouts RAM
Visit https://www.scoutsram.co.uk
The link is also avaliable to leaders in the OSM Dashboard Notepad.
Support with using Scouts RAM
Support videos that show you how to use all the features in Scouts RAM can be found here: https://www.youtube.com/channel/UC-l0O6UKJ1DTbscYc41Zv3g/videos
If you need any other support with the Microsoft 365 portal or Scouts RAM, please contact Steven.